Sunday, 1 May 2011

Problems with the video drivers in Ubuntu 11.04

Last Friday I upgraded my desktop to Ubuntu 11.04, and yesterday Saturday I upgraded my laptop. In both cases I had problems with the video drivers and I think I solved them. Just in case someone is having similar problems, here I'll write about the problems I had and what I did to solve them. I'm writing this from memory so I may have missed some of the many things I tried, or I did them in the wrong order, or in the writing I mix up the exact names of the software I used and the options I selected... but hopefully this information is still useful.

My desktop computer has dual monitor and an nvidia graphics card. I didn't manage to make the nvidia drivers work with the previous release so I was using the default drivers, which worked well enough for me since I didn't use the computer for fancy graphics or games. But when I upgraded to Ubuntu 11.04 I had problems with the display.

On the first startup, the monitors froze after logging in. I could only see the desktop background, that's all. There were no menus, no mouse pointer, nothing. Just the background image. I restarted a couple of times in ubuntu and in the other OS, Windows 7, but whenever I logged into Ubuntu I could only see the background image.

The first thing I did was to load the recovery version, and select the option to repair broken packages. The system didn't report anything special: no packages were found broken, so nothing was done. And again, after logging in, I could only see the background image.

Next I tried to login in with the failsafe display. Login was successful but the display behaved in a very strange manner. The monitor on the left had a black screen and the mouse pointer, whereas the monitor on the right had the desktop contents. To click on an item on the monitor on the right I had to use the mouse on the monitor on the left and predict where I was clicking... a very strange setup and very frustrating!

So I disconnected one monitor and restarted again. Now mouse and desktop were in the one monitor but there were no window decorations so I could not move or resize the windows. And it wasn't displaying the new "unity" desktop graphics but the classic one.

I tried several options. First of all I logged in again, this time asking to re-configure the graphic display (this is an option I saw when logging in on the failsafe session), but again the windows had no decorations and the desktop had the classic setup instead of the "unity" setup.

Finally I asked to use the generic display when logging in with the failsafe session and I managed to have the "unity" graphics. I asked to have the new graphic setting permanent, plugged the second monitor, and logged in again. The "unity" graphics appeared the contents of the two monitors were replicated. I opened the monitor manager and I selected the "extended desktop" option. Now everything was displayed as I wanted! I was so excited to see it apparently working and I was so late for dinner that I went home without checking whether the windows had decorations... I'll find out tomorrow Monday.

Yesterday Saturday I upgraded the laptop. During the upgrade the system reported errors with the xorg package so expected the worse. And true, after restarting the system would not even show the login page. Instead, the monitor showed a mix of colourful pixels.

The first thing I did was to select the option to repair broken packages in the recovery session, and to my relief it reported that some packages were repaired. Yet after restarting the monitor still showed the mix of colourful pixels in apparent random distribution. Next I selected the option to reconfigure the graphics but again, nothing interesting happened.

Next I selected the option to use the generic display, and now I could log in and see the desktop. Success! The windows had decorations, but the desktop setup was the classic, not the "unity" setup, because a message said that the laptop didn't have the hardware to run unity. I couldn't believe that since the laptop has an nvidia card which is supposed to be powerful enough. I opened the "restricted drivers" interface but it didn't show the nvidia driver there. I searched in synaptics package manager and I found several drivers, but they could not be installed because the source was not enabled. So I enabled the source and opened the "restricted drivers" interface. Now I could see the recommended nvidia drivers there, great! I selected the recommended one, and after re-starting I could see the unity interface.

Success! now I can use the laptop, and hopefully the desktop at my office works too.

The next thing is to get used to the unity interface. So far it doesn't look as useful as the classic one so I may end up switching to the classic one but let's give it a few more days.

Monday, 21 March 2011

How to install a Python module in Windows?

The Python documentation is very detailed on how to install Python modules: you simply type something like this at the terminal window:

python setup.py install

The problem is, how do you do this in a Windows-based PC? I tried the following but it didn't work:
  1. Open a command prompt by type "cmd" at the "Run..." option from the start menu (I'm using Windows XP)
  2. Navigate to the folder where we have downloaded our Python module
  3. Type python setup.py install
When I tried that I got this error message:

'python' is not recognized as an internal or external command, operable program or batch file.

The problem is that the path of the executable python.exe is not listed in the PATH environment variable. I went round the problem by typing the exact location of the executable:

C:\python27\python setup.py install

But then I got another error! It turns out that the package I wanted to install requires another package called setuptools... back to the drawing board.

Fortunately I found documentation about setuptools. The module is packaged for a range of distributions including Windows, I only need to run its executable to install the package. And the good thing of this module is that provides a program called easy_install, which is located in C:\Python27\scripts. With this program you can actually install many other packages. It will download the package, install it, and solve any possible dependencies by downloading and installing additional packages.

So, to install a new Python package, say, suds, in a Windows PC, my current sequence of steps was:

  1. Open a command prompt as before.
  2. Type C:\Python27\scripts\easy_install suds

End of story! and it works! for me, anyway. You can find additional documentation about easy_install here.

Thursday, 4 December 2008

How do I setup a Huawei E220 USB wireless modem in Ubuntu linux?

I have one of those USB wireless modems, a Huawei E220, which I can use to access the internet from many Australian cities using the three network. The modem works fine in Windows but I had many problems to make it work in Ubuntu. I finally found some useful information on the web, and the process is not as hard as I thought could be. Here's a summary of how to do it. But first of all, an explanation of how the modem works.

After plugging in the USB modem, two USB devices are created in /dev/TTYusb0 and /dev/ttyUSB1. The first one, /dev/ttyUSB0, is the actual modem. The computer sees the modem as a dial-up modem. So to use it, the computer needs to use the modem and "call" a special phone number via the modem. This can be done with the program wvdial.

To configure wvdial, edit the file /etc/wvdial.conf so that it looks like this (you need to edit with sudo and have administrator permissions):

[Dialer Defaults]
Init1 = ATZ
Init2 = ATQ0 V1 E1 S0=0 &C1 &D2 +FCLASS=0
Modem Type = Analog Modem
ISDN = 0
Modem = /dev/ttyUSB0
Phone = *99#
Username =
Password =
Baud = 460800
New PPPD = yes

That's it! You can type whatever you want as a username and password. Now plug the modem, wait for a few minutes until the device /dev/ttyUSB0 exists, and run the following command:

wvdial Defaults

For some reason that I don't understand, the first time I try this the connection always drops, so I need to unplug the modem, plug it again, wait a few minutes and then type wvdial Defaults again. Then it works.

Wednesday, 27 August 2008

How do I set a dual screen output for Linux Ubuntu/Kubuntu?

Linux does have many good things, but sometimes you really need to try hard to get the best of it, or even to do what is taken for granted, say, in Windows. One example is for allowing a laptop to use an external monitor. I have a Dell laptop, model XPS M1210 with nVidia graphics card. The laptop has two partitions, one with Windows Vista, and the other with Linux Ubuntu or Kubuntu, both are basically the same thing with different clothes. I use this laptop to give lectures at Macquarie University and therefore the external monitor is essential. But I haven't yet managed to use the external monitor under Ubuntu easily.

Under Windows Vista, you just need to type Fn+F8. This combination of keys alternates the use of the laptop screen, the external screen, or both. However, in Ubuntu you first need to do a lot of under-the-hood tinkering until you get something that works somewhat.

First, I had to install the nVidia driver. Some time ago I unsuccessfully tried to do it, until I found Envy, an installer written by Alberto Milone that does all the job very easily. Thanks so much Alberto! This was last year, when I was using a former version of Ubuntu (was it Feisty Fawn...?). Recently I tried to use it again to re-install the driver but it didn't work any more... pity. There are other options, or so the Synaptic Package Manager tells me. I tried some of them but I don't remember which ones worked and which ones didn't work.

Anyway, once you get the driver installed you need to edit one of those mysterious files, in particular the file /etc/X11/xorg.conf. Before you even think of editing this file it's best if you make a back up of it, otherwise you might not be able to use your graphic display any more. Since you need the superuser privileges you need to type the following:
sudo cp xorg.conf xorg.conf.bkup
Then, edit the file using your favourite editor. Mine is emacs. Since you need to use superuser privileges to edit this file, you edit it by typing:
gksudo emacs xorg.conf
Then you need to specify that the screen uses Twin View, and some characteristics such as screen resolution. This is what I added to the entry Section "Screen":
#    Option         "RenderAccel" "True"
Option "TwinView"
# Option "TwinViewOrientation" "Clone"
Option "MetaModes" "1280x800,1280x800; 1280x1024,1280x1024; 1024x768,1024x768"
Option "SecondMonitorHorizSync" "50"
Option "SecondMonitorVertRefresh" "60"
# Option "UseDisplayDevice" "DFP, CRT"
# Option "ConnectedMonitor" "CRT"
Noted that some of the text is commented out? This is because I haven't yet managed to work the way I want, but I'm coming to this in a minute. Just to finish, you need to save the file, plug the external monitor, and then restart the window manager by typing Alt-Ctrl-Backspace. You could also restart the system completely but of course that takes longer.

In theory this should make it work, or at least the tutorials listed below say. But I haven't yet managed to have both the laptop screen and the external monitor active. More often than not, the laptop screen appears completely blank and I can only use the external monitor. I tried to add other options following some suggestions from the Internet, but none of them helped, and in some occasions (such as the options "useDisplayDevice" and "ConnectedMonitor" made things worse.

So well, I can use the external monitor after several hours of trying, but it's not yet the way I wanted it to work... I'll keep trying.

Some tutorials that I used:

Monday, 4 August 2008

Setting the default display manager in Ubuntu/Kubuntu

One of the good things of Ubuntu, and Linux in general, is that there is a wide range of windows managers. You aren't stuck to the look and feel given by a company, but you can choose among several options. Two of the most popular windows managers in the Linux world are GNOME and KDE. The default manager in Ubuntu is GNOME, but if you use Kubuntu, the default is KDE.

Kubuntu and Ubuntu are very much the same thing but the looks are different, using different user interface philosophies. Ubuntu/GNOME is robust and ideal for those who want to use the computer for productivity, whereas Kubuntu/KDE is flexible and customisable and ideal for those who like looking "under the hood", but it's less reliable (sometimes you really need to look under the hood to fix some specific problems).

I generally find the look and feel of GNOME more elegant, and that of KDE more nerdy, but that's just my opinion.

I sometimes like GNOME, other times prefer KDE, and I end up switching from one to the other whenever one of them announces a new improvement, which is quite often.

But surprisingly I found very little information about how to switch from one to the other... finally, after looking here and there, I found out. It's simple, as these things are once you know them. Here's what you need to do:
  • If you are under Ubuntu (GNOME) and want to switch to Kubuntu, simply install kubuntu-desktop by using Synaptics or your favourite package manager
  • If you are under Kubuntu (KDE) and want to switch to Ubuntu... well, simply install ubuntu-desktop by using adept_manager or your favourite package manager
KDM and GNOME have their own display managers, and oddly enough KDM does work fine under GNOME's display manager, and vice-versa. So there's no real need to change display managers unless you want to. To do this, after installing kubuntu_desktop or ubuntu_desktop simply edit the file /etc/X11/default-display-manager so that it has the following contents:
  • /usr/sbin/gdm to set GDM, that is, the Gnome display manager
  • /usr/bin/kdm to set KDM, the KDE display manager
  • /usr/lib/kde4/bin/kdm to set KDM for KDE4, the new version of KDE which is still under experimentation. To use KDE4 you will need to install the package kubuntu-kde4-desktop (you guessed right)
I like the look and feel of GNOME but I want the flexibility of many of the programs associated with KDE (such as digikam for managing photos, or amarok for playing music). The good thing is that these programs also run under GNOME so it is actually possible to get the best of both worlds.

Tuesday, 29 July 2008

I can't delete a KDE4 widget


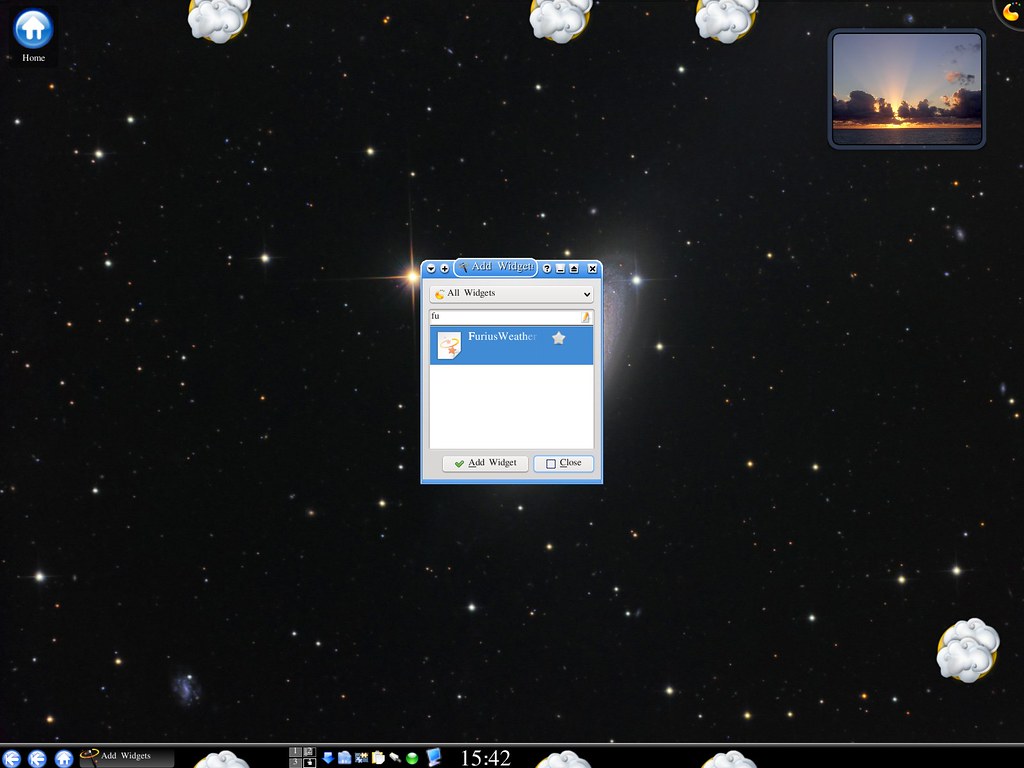
Last week I installed Furius Weather, a cool widget for KDE4 that displays the weather in your preferred location. This widget, though, is not perfectly integrated in the KDE4 plasma, and for example you can't add it to the task bar at the bottom, or at least I didn't manage to do it.

I tried to add it by following the usual procedure: select "Add widgets" on right-click at the desktop, and then drag the entry for Furius weather to the bar. When I did that, a dialogue appeared that prompted for a theme. I selected my default theme which I had downloaded from Furius Weather. To my horror I saw that the default theme uses large icons which did not fit on the task bar.

I tried to delete the widget using the usual way: select "Add widgets" and click on the star next to Furius Weather, but nothing happened. Actually, I don't know how I ended up having three instances in my task bar! See the image. Now I had almost no space for anything else in the bar.

Today, finally I found the solution. You need to edit the file ~/.kde4/share/config/plasma-appletsrc. In the file I found 18 references to FuriusWeather! I guess that was how many times I added the widget and tried to delete it. I removed all references, restarted the window manager (ALT CTRL <-; don't just log out or restart the computer or KDE will overwrite your modifications), and the desktop came back clean.

Wonderful!

How can I add a personalised wallpaper to KDE4?


I have been trying KDE4 for a few months. This is the new version of KDE, a Linux desktop that has a beautiful interface. But currently it's not as easy to customise as the old trusty KDE 3. For example, do you know how to use one of your own photos as a wallpaper? There are no right-click actions on dolphin, the file manager, and I didn't find any settings anywhere that would tell where to put your images for wallpapers.

If you right click on the desktop and select "Configure Desktop..." you are offered with a selection of wallpapers, and you can even download new ones. But what if you want to use your own photos?

Finally I found out. You can copy your photo to the hidden folder ~/.kde4/share/wallpapers. If you're using dolphin you will need to select "Show Hidden Files" in the "View" menu. Then, next time you right-click on the desktop and select "Configure Desktop..." you can select your new wallpaper.

Easy! But I didn't find any documentation on the webpages about this... how are we supposed to know?

... update ... I found an easier way to add your own wallpaper. In "Configure Desktop" there's a tiny icon next to the drop down selection of the picture. If you click on that icon a file selector will appear to find your own file... see the picture of this blog. I didn't see that one!